
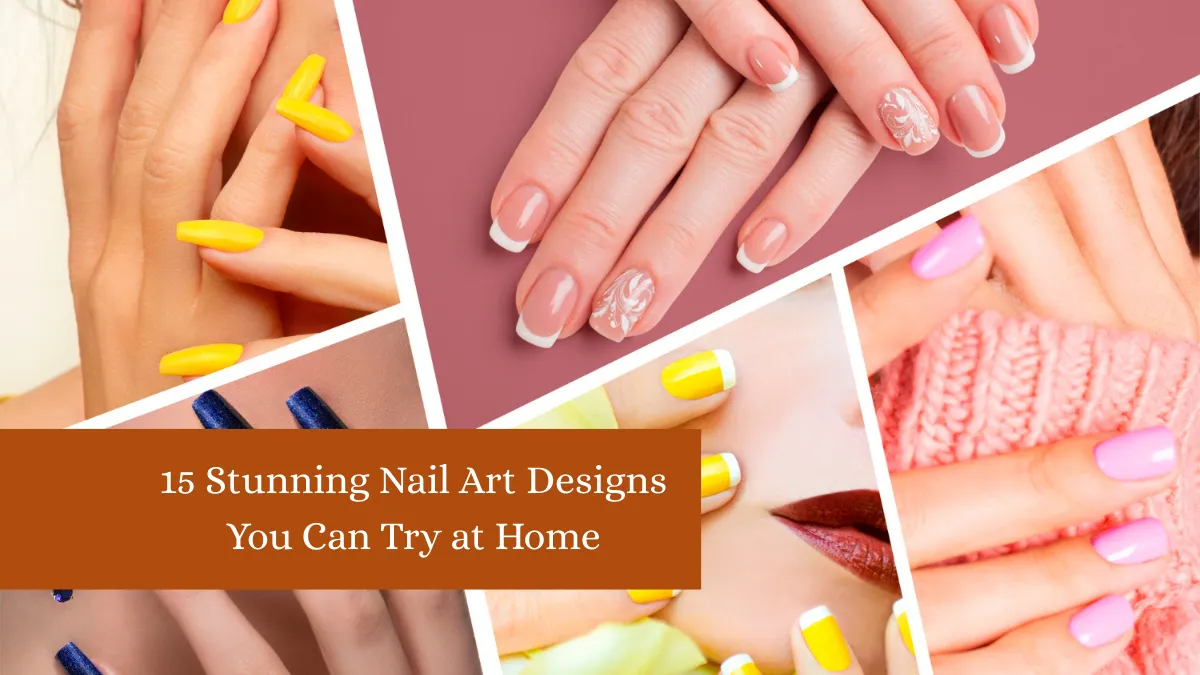
Nail art is one of the most exciting ways to express creativity and style, and the best part is—you don’t need to visit a salon to achieve gorgeous results. With the right tools, a little patience, and some practice, you can create stunning nail art designs from the comfort of your own home. Whether you prefer minimal elegance or bold statement looks, there’s a nail art style for every mood, season, and occasion.
Beginners often think intricate designs are too challenging, but many techniques are surprisingly simple when broken down into easy steps. From chic French tips to colorful ombrés, each style offers a unique way to showcase your personality. In this guide, we’ll explore 15 stunning nail art designs you can try at home, complete with practical tips for execution. By the end, you’ll have plenty of inspiration to keep your nails looking stylish year-round—without breaking the bank.
1. Classic French Tips
The French tip is a timeless nail design that exudes elegance and sophistication. It involves painting the nail in a natural or nude shade and adding crisp white polish to the tips. While traditionally straight across, modern French tips can be curved or angled for a more contemporary feel. To achieve this at home, start by applying a clear base coat to protect your nails. Once dry, use nail guide stickers or painter’s tape to mark off the tips. Apply a thin layer of white polish, ensuring even coverage.
Let it dry completely before carefully removing the guides. Seal the look with a glossy top coat for a smooth finish. For a twist, you can experiment with colored tips instead of white—pastels for spring, neon for summer, or metallics for a festive touch. The beauty of the French tip lies in its versatility; it’s subtle enough for work but polished enough for special occasions.
2. Glitter Gradient Nails
Glitter gradient nails are perfect for adding sparkle without overwhelming your entire manicure. The design transitions from a concentrated glitter at the tip or base to a softer shimmer toward the opposite end. Begin by applying a solid base color—neutral tones work best for subtlety, while bold shades create a statement. After your base coat dries, use a makeup sponge to dab glitter polish starting at the desired end of your nail, gradually blending it out for a gradient effect.
Repeat this process 2–3 times for maximum opacity. A top coat will smooth out any texture from the glitter and add shine. Glitter gradients are ideal for parties, holidays, or anytime you want your nails to catch the light. For variation, try holographic or chunky glitters for extra dimension. The gradient technique also works beautifully over dark polishes, creating a starry-night effect that’s both elegant and playful.
3. Polka Dot Play
Polka dots are fun, whimsical, and surprisingly easy to create at home. This design works well with any color combination, making it endlessly customizable. Start with a base coat to protect your nails, then apply your chosen background color. Once dry, dip the tip of a dotting tool—or even a bobby pin—into a contrasting nail polish color and gently press it onto your nail to create dots. You can space them evenly for a neat, classic look, or place them randomly for a more playful style.
Alternate between different-sized dots to add visual interest. For a chic twist, try monochrome dots on a neutral base or pastel dots over white for a spring-ready vibe. Always allow each layer to dry before adding your top coat to prevent smudging. Polka dot nails are perfect for beginners since they require minimal tools and still produce eye-catching results that suit casual and fun occasions.
4. Color Block Nails
Color block nails make a bold fashion statement by combining contrasting or complementary shades in geometric sections. To create this look at home, start with a base coat and apply your first nail color. Once dry, use striping tape or regular tape to section off parts of your nail. Paint the exposed area with your second color, carefully removing the tape before the polish dries completely to ensure clean lines. You can repeat this process with additional colors for a more complex design.
Metallic shades, pastels, and bold neons all work beautifully for this style. For an extra touch of sophistication, outline each color block with thin black or gold lines using a fine nail brush. The color block design is versatile—go for high-contrast combinations for drama or similar tones for a more subtle, blended look. This modern design is perfect for those who love playing with colors while keeping a sleek, artistic feel.
5. Ombre Nails
Ombre nails feature a seamless blend from one color to another, creating a soft gradient effect. While they look intricate, they’re easy to achieve at home with a makeup sponge. Apply your base coat and paint your nails with the lightest shade in your chosen color palette. On the sponge, paint two stripes—one of each color—slightly overlapping in the middle. Dab the sponge lightly onto your nails, moving up and down to blend the colors.
Repeat until you reach the desired intensity, then clean the skin around your nails with a brush dipped in nail polish remover. Finish with a glossy top coat to smooth the gradient and enhance the colors. Ombre nails can be subtle with pastel transitions or bold with high-contrast shades like black and red. This technique works year-round and can be adapted for seasonal themes—think orange to gold for autumn or icy blue to silver for winter.
6. Marble Effect Nails
Marble nails mimic the look of real stone, adding a luxurious, high-end feel to your manicure. To create this effect at home, start with a white or light gray base coat and let it dry completely. On a piece of foil, place small drops of black, gray, or metallic nail polish. Using a fine detailing brush or a toothpick, lightly swirl the colors together—but don’t overmix, as you want distinct streaks.
Gently dab the swirled polish onto your nails using a small piece of sponge or the brush itself, creating natural, uneven lines. For a more fluid marble effect, try the water marble method: drip polish into a cup of water, swirl with a toothpick, then dip your nail into the pattern. Always seal the design with a clear top coat to smooth the texture and add shine. Marble nails look stunning in monochrome, but you can also experiment with colors like rose gold, teal, or navy for a modern twist.
7. Floral Accent Nails
Floral nail art is a beautiful, feminine design that works for any season, from pastel blossoms in spring to rich-toned flowers in fall. Start with a neutral or pastel base color for the perfect backdrop. Using a thin nail art brush or a dotting tool, create small petal shapes in your chosen color. Add a contrasting dot in the center for detail, and finish with green leaves for realism. For beginners, stamping plates with floral designs can make the process faster and easier.
Floral patterns can be applied to every nail for a bold statement or as an accent on just one or two nails for subtle charm. To make your design pop, layer lighter flowers over a darker background or use metallic polish for the petals. This style is endlessly customizable—switch up flower types, sizes, and colors to match your mood or outfit. A glossy top coat will enhance the design and keep it looking fresh longer.
8. Negative Space Nails
Negative space nails use the natural nail as part of the design, creating a modern, minimalist effect. Begin by applying a clear base coat to protect your nails. Then, use striping tape, stickers, or stencils to block off sections you want to remain bare. Paint over the exposed areas with your chosen polish color. Once dry, carefully remove the tape to reveal sharp, clean lines between the colored and bare sections. You can create geometric shapes, stripes, or even intricate patterns.
For an elevated look, combine negative space with glitter, metallics, or bold color blocking. This design is perfect for beginners because it’s forgiving—small mistakes often blend into the pattern. Plus, it tends to last longer since bare nail areas show less chipping. Negative space nails are versatile enough for everyday wear yet chic enough for events, making them a go-to choice when you want something unique but low-maintenance.
9. Striped Statement Nails
Striped nails are bold, clean, and endlessly versatile. Start with a base coat, then apply your background color. Once dry, place striping tape in your desired pattern—vertical, horizontal, diagonal, or even crisscross. Paint over the taped areas with a contrasting color, then carefully remove the tape before the polish sets completely to avoid smudging. You can create uniform stripes for a neat, graphic look or mix widths for a more dynamic design.
Metallic stripes over matte backgrounds give a glamorous edge, while pastel stripes feel playful and summery. Beginners can also try freehand striping with a fine brush for a more organic style. Stripes work well as accents on just one or two nails or across the whole manicure for a bold statement. They pair beautifully with other designs like florals, glitter gradients, or negative space, making them a versatile base technique to master.
10. Foil Transfer Nails
Foil nails deliver instant drama with their reflective, metallic finish. To create this look, start with a base coat and your chosen nail color. Once it’s dry, apply a thin layer of nail foil adhesive (available at beauty supply stores) to the areas where you want the foil to stick. Wait until the glue turns clear and tacky, then press the foil sheet—shiny side up—onto your nail, rubbing gently to transfer the design. Peel away the sheet to reveal the foil pattern.
Foil designs range from solid metallics to intricate holographic prints, and you can apply them across the whole nail or just in sections for an accent effect. Always finish with a water-based top coat to prevent dulling the foil’s shine. This design is surprisingly quick to do and creates a high-impact, salon-like result without advanced skills, making it a favorite for special events or glamorous nights out.
11. Animal Print Nails
Animal print nails—like leopard, zebra, or snake patterns—are bold and trendy, perfect for adding an edgy twist to your look. Start with a base coat and your background color; neutrals like beige or white make animal patterns pop. For leopard spots, use a dotting tool to create uneven dots in a darker shade, then outline them loosely with black polish. Zebra stripes can be drawn with a thin nail art brush in irregular, flowing lines.
For snake skin, you can use a mesh stencil or netting, painting over it to create a textured effect. Animal prints work well in traditional colors (brown, black, gold) or fun, unexpected shades like neon or metallics. You can apply the print to all nails or use it as an accent with solid-colored nails for balance. Seal your design with a glossy top coat to make it last and add a polished finish.
12. Matte Finish Nails
Matte nails have a velvety, shine-free texture that feels chic and modern. You can achieve this look easily at home by applying a matte top coat over any polish color. For a simple yet striking effect, paint all nails with a bold shade like burgundy, navy, or emerald, then mattify. Matte finishes also pair beautifully with glossy accents—such as leaving the tips shiny for a “matte French” look or adding glossy stripes over matte backgrounds for contrast.
The key to a flawless matte manicure is ensuring your polish layers are smooth, as matte formulas highlight imperfections more than glossy ones. Matte nails are versatile, working for both understated daily wear and glamorous evening looks. They also photograph beautifully, making them a favorite for social media nail inspiration.
13. Watercolor Nails
Watercolor nails create a dreamy, artistic effect reminiscent of painted art. Start with a white or light pastel base to help colors stand out. Using a small brush, apply drops of different nail polish colors diluted with a bit of nail polish thinner or acetone. Let the colors spread naturally, blending slightly but not completely for a soft, diffused effect. You can layer additional colors once the first layer dries for more depth.
For extra definition, outline certain areas with fine black lines to mimic ink art. This design works beautifully with floral themes, abstract patterns, or soft seasonal palettes. While it may look intricate, watercolor nails are forgiving—mistakes often add to the organic, artistic style. Always seal your design with a glossy top coat to protect the delicate color blending and add a smooth finish.
14. Rhinestone Accent Nails
Rhinestones instantly elevate any manicure, adding sparkle and dimension. Begin with your chosen base color, then apply a small drop of clear nail glue where you want to place each rhinestone. Using tweezers or a wax pencil, carefully position the rhinestone and press gently to secure it. You can create simple designs with one stone per nail for elegance or go all out with intricate patterns covering the entire nail.
Mixing different sizes and shapes can create a more dynamic look. Rhinestones work beautifully for special events, weddings, or holidays, and they pair well with other designs like ombre or matte nails. To make them last, apply a thick top coat around (but not over) the stones to lock them in place without dulling their sparkle.
15. Seasonal Nail Art Themes
Seasonal nail designs let you celebrate holidays and weather changes right at your fingertips. In winter, try snowflakes, icy blues, and silver glitter. Spring is perfect for pastel florals, butterflies, and light, fresh patterns. Summer calls for bright neons, tropical prints, and fruity designs, while autumn brings warm tones, leaves, and plaid patterns.
To create these at home, invest in a small set of nail art brushes, dotting tools, and stamping plates with seasonal motifs. Start with a themed color palette, then build designs using freehand painting, stamping, or decals. Seasonal art keeps your nails feeling fresh and festive, and the themes can be as simple or detailed as you like. Sealing your work with a strong top coat ensures your seasonal flair lasts until it’s time for the next theme.
Bottom Line
Nail art is no longer limited to salons—you can achieve stunning designs right at home with creativity, the right tools, and a bit of practice. Whether you prefer minimalist styles like negative space and matte finishes or bold looks like animal prints and rhinestones, there’s something for everyone. Experiment, mix techniques, and don’t be afraid to personalize each design to suit your style.
FAQs
1. What’s the easiest nail art for beginners?
Polka dots, French tips, and glitter gradients are beginner-friendly.
2. Do I need special tools for nail art?
Basic designs can be done with household items like bobby pins and tape, but brushes and dotting tools help.
3. How long does nail art last?
With a good base and top coat, most designs last 7–10 days.
4. Can I do nail art on short nails?
Yes—many designs like ombre and negative space work beautifully on short nails.
5. How can I make my nail art last longer?
Apply a base coat, seal with a top coat, and avoid harsh activities without gloves.
✨ You May Also Like ✨