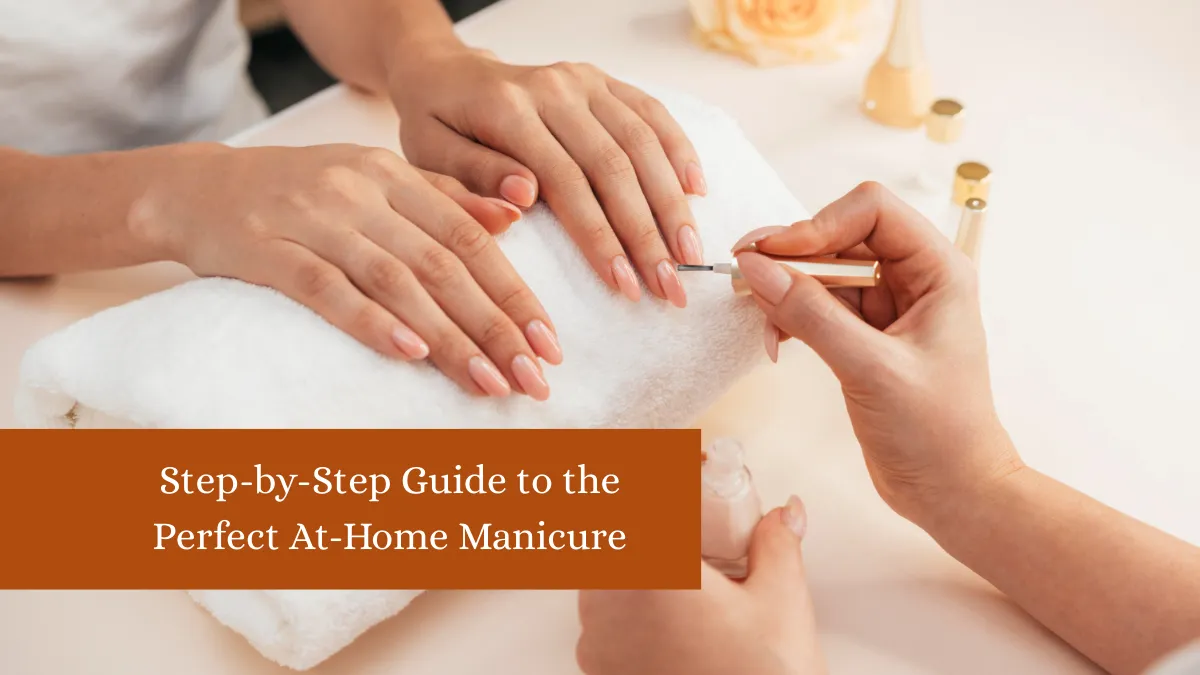
A well-done manicure instantly makes your hands look polished, neat, and confident. While professional salon visits can be a treat, doing your manicure at home saves money, time, and allows you to pamper yourself on your own schedule. The best part? With the right tools, techniques, and a little patience, you can achieve salon-quality results from the comfort of your own space.
An at-home manicure is not just about applying nail polish—it’s about caring for your nails, cuticles, and skin so that they look healthy and feel strong. It also gives you the freedom to experiment with shapes, colors, and finishes that reflect your style. This guide will walk you through every step, from preparation to the finishing touches, ensuring your nails not only look beautiful but also remain healthy. Follow these steps closely and you’ll have a flawless manicure that lasts longer and looks professionally done.
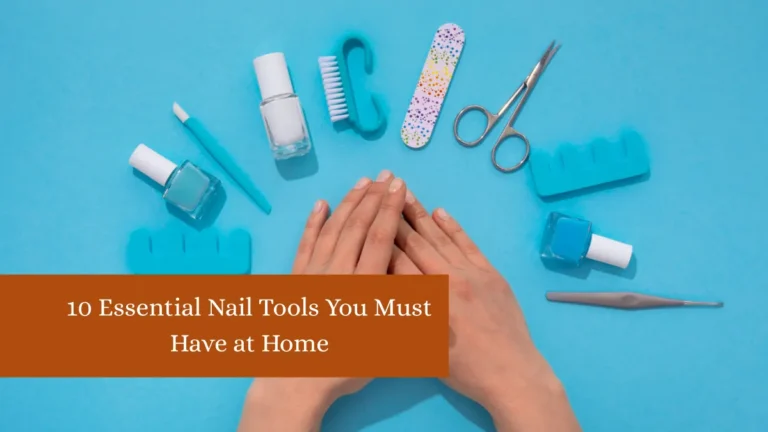
1. Gather Your Tools and Products
Before starting your manicure, make sure you have all the necessary tools in front of you to avoid interruptions. The basic manicure kit should include a nail file, buffer, cuticle pusher, cuticle trimmer, nail clippers, and a soft nail brush. For polish application, you’ll need a good-quality base coat, your chosen nail polish color, and a top coat for shine and protection. You may also want nail polish remover, cotton pads, cuticle oil, and a moisturizing hand cream.
If you’re aiming for a truly professional result, invest in glass nail files (gentler on nails), a nail buffer with varying grit, and acetone-free nail polish remover to prevent excessive dryness. It’s also helpful to have a small bowl of warm water for soaking your nails, which will make cuticle care easier. Gathering everything beforehand ensures you can work smoothly through each step without your nails drying unevenly or smudging.
2. Remove Old Nail Polish Thoroughly
Start with a clean canvas by removing any old nail polish. Use an acetone-free remover if possible, as it is less drying for your nails and cuticles. Place a remover-soaked cotton pad on your nail, press gently for a few seconds to let the remover break down the polish, then wipe it off in one smooth motion. For stubborn glitter or gel polish, wrap your nail with a remover-soaked pad and foil for 5–10 minutes before gently wiping away.
Avoid aggressive scraping, as this can damage the nail surface and cause peeling. Once the polish is completely removed, wash your hands to eliminate any remaining remover residue, which can interfere with the new polish’s adhesion. This step ensures your new manicure applies smoothly, lasts longer, and has a flawless finish. A proper removal process also helps keep your natural nails healthy and stain-free over time.
3. Shape Your Nails with Care
Nail shaping is essential for both aesthetics and nail health. Start by trimming nails to your desired length using nail clippers, making sure not to cut too short to avoid exposing sensitive nail beds. Then, use a fine-grit file to shape the edges—common shapes include square, round, almond, and oval. Always file in one direction rather than sawing back and forth, as this reduces splitting and breakage.
The shape you choose should complement your finger shape and lifestyle; for example, rounded or oval nails tend to be more durable for everyday tasks, while square or almond shapes create a more fashionable look. Take your time during this step, as a well-shaped nail will improve the overall appearance of your manicure and help prevent snagging. Once shaped, lightly buff the surface to smooth out ridges, allowing the polish to apply evenly and last longer without chipping.
4. Soak and Soften Cuticles
Fill a small bowl with warm water and add a few drops of mild soap or a moisturizing oil. Soak your nails for 5–10 minutes to soften cuticles and skin around the nails. This makes cuticle care much easier and gentler. Avoid soaking too long, as overhydration can weaken nails temporarily. After soaking, gently pat your hands dry and apply a cuticle remover cream or oil to help dissolve dead skin.
This step not only preps your cuticles for pushing back but also hydrates the skin, leaving your hands feeling soft and nourished. Soaking is also a relaxing part of the process—it’s like giving your hands a mini spa treatment. Consistent cuticle care prevents hangnails, promotes healthy nail growth, and gives a neater overall manicure appearance. This step is crucial for achieving a professional, polished look that lasts beyond a few days.
5. Gently Push Back and Trim Cuticles
Once your cuticles are softened, use a cuticle pusher (preferably a wooden or stainless steel one) to gently push them back toward the nail base. Be careful not to push too hard to avoid damaging the nail matrix, which can affect nail growth. If necessary, use a cuticle trimmer or nipper to carefully remove excess dead skin, but avoid cutting healthy living tissue as this can lead to infections and irritation.
Proper cuticle maintenance gives nails a clean, elongated appearance and helps polish adhere better without lifting at the edges. After trimming, massage a drop of cuticle oil into each nail to restore moisture and keep the skin supple. Cuticle care is often overlooked in at-home manicures, but it plays a significant role in both nail health and aesthetics. Neglecting this step can result in ragged edges and polish peeling prematurely.
6. Buff the Nail Surface for Smoothness
Buffing is key to achieving a smooth, even base for your polish. Use a multi-sided nail buffer, starting with the coarser side to gently smooth ridges, then moving to finer sides for a polished, satin-like finish. Avoid over-buffing, as this can thin the nail and make it more prone to damage. The goal is to create a clean, slightly rough surface that helps polish adhere better.
Buffing also stimulates blood flow to the nail bed, promoting healthy growth over time. This step ensures that your polish applies evenly without streaks and lasts longer without chipping. It’s particularly important if you have natural ridges or discoloration, as it evens out the nail tone. After buffing, wipe nails with a damp cotton pad to remove dust and debris before moving to the next step.
7. Apply a Protective Base Coat
A base coat is the foundation of a long-lasting manicure. It serves multiple purposes: protecting your natural nails from staining, filling in minor ridges, and providing a smooth surface for color application. Choose a base coat formulated with strengthening ingredients like keratin, biotin, or calcium if you have weak or brittle nails. Apply a thin, even layer and let it dry completely before adding color. Skipping this step can cause your manicure to chip sooner and lead to discoloration from darker polishes.
A good base coat also improves polish adhesion, meaning your manicure will last longer. For those with peeling or splitting nails, certain base coats act as treatment formulas, gradually improving nail condition with regular use. Applying this layer carefully sets the stage for a flawless, professional-looking finish that stays intact for days.
8. Apply Your Nail Polish in Thin Layers
When applying nail polish, thin layers are key for a smooth, even finish and faster drying time. Start with a small amount on the brush, wiping excess on the bottle’s rim. Place the brush a short distance from the cuticle, then gently push toward it before sweeping to the tip. Use three strokes: one in the center and one on each side.
Allow each layer to dry for at least two minutes before adding the next to avoid smudges and bubbling. Two coats are usually sufficient for full coverage, but sheer colors may require a third. Applying thin coats helps the polish cure properly, making it less prone to chipping and peeling. Take your time—rushing this step often leads to imperfections that shorten your manicure’s lifespan.
9. Seal with a Glossy or Matte Top Coat
A top coat locks in your color, adds shine (or a chic matte finish), and protects against chips. Apply it generously over the entire nail surface, extending slightly over the tips to seal the edges. This “capping” technique greatly reduces premature wear and peeling.
A high-quality top coat can also provide UV protection, preventing yellowing and fading. If you want a quick-dry option, choose a fast-drying top coat, but be aware they may not last as long as regular formulas. For extra durability, apply a fresh layer of top coat every 2–3 days to extend your manicure’s life. Skipping this step will significantly shorten the time your manicure looks fresh and polished.
10. Moisturize and Maintain Your Manicure
Once your nails are completely dry, finish with a generous massage of hand cream and cuticle oil to restore moisture lost during the manicure process. Keeping nails and surrounding skin hydrated prevents brittleness and hangnails. For maintenance, wear gloves when doing household chores, avoid using nails as tools, and reapply cuticle oil daily. A little care goes a long way in keeping your manicure chip-free and your nails healthy. Maintaining your manicure is just as important as the initial application if you want long-lasting results.
Bottom Line
A perfect at-home manicure is all about preparation, patience, and protection. By following each step—from thorough nail cleaning to sealing with a top coat—you can achieve salon-worthy results without leaving your home. The key is not to rush, use quality products, and maintain your nails daily. Consistency in care ensures not only a beautiful finish but also healthier nails over time.
FAQs
1. How often should I do a manicure at home?
Every 1–2 weeks, depending on nail growth and polish wear.
2. Can I skip the base coat?
It’s not recommended—base coats protect and help polish last longer.
3. What’s the fastest way to dry nails?
Use thin coats and allow proper drying time; quick-dry sprays can help.
4. How do I prevent bubbles in my polish?
Avoid shaking the bottle and apply in thin, even coats.
5. Can I use hand lotion before polishing?
Yes, but wipe nails with remover first to remove oils.
✨ You May Also Like ✨